
今回は、WebFluxの使い方についてサンプルを見ながら勉強していきたいと思います。
WebFluxとは
Springが提供しているWeb Frameworkで、Nettyのようなサーバー上で、ノンブロッキングな処理を実行できます。ノンブロッキングに処理を行うことで、スレッドを節約することができ、スケーラブルなプロダクトにできるため採用しました。
ノンブロッキングI/O
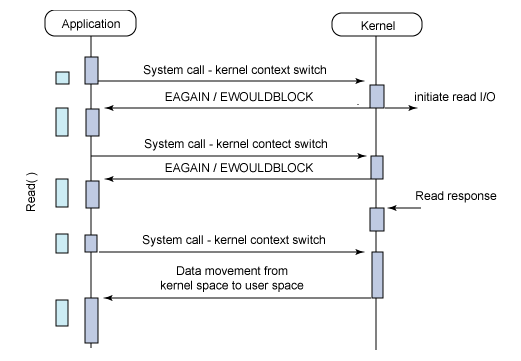
ノンブロッキングI/OではI/O対象のファイルディスクリプタの準備完が了していないことをアプリケーション側に伝えるため即座にエラーが返る(errnoにEGAINが格納されて返ってくる)。
一般に、O_NONBLOCKフラグを利用してノンブロッキングモードを宣言するが、この時プロセスはブロック状態にならず、CPUを他の処理に回すことができるためI/O待ち時間を有効活用できる。エラーはアプリケーション側でハンドリングしてリトライするタイミングを定義する必要がある。ノンブロッキングI/Oはソケットなどのネットワークに用いられるI/OモデルでディスクI/Oには使わない。C10K問題の対策としてノンブロッキングI/O+イベントループモデルを採用することでシングルスレッドで複数の接続を処理する方法がある。
サンプル
サンプルコードはSpringboot+WebFlux+Thymeleaf+Gradleです。
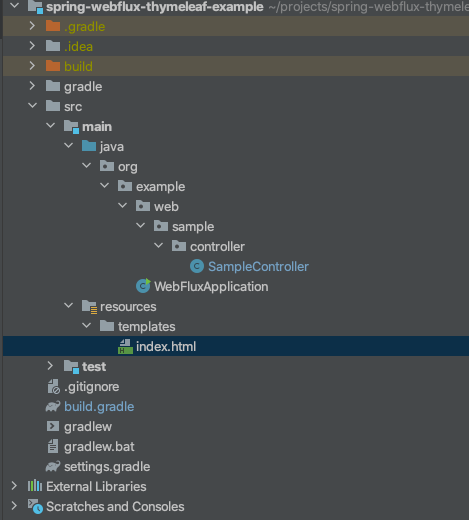
プロジェクト構成
build.gradle
buildscript {
    ext {
        springBootVersion = '2.3.5.RELEASE'
    }
    repositories {
        mavenCentral()
        jcenter()
    }
    dependencies {
        classpath("org.springframework.boot:spring-boot-gradle-plugin:${springBootVersion}")
    }
}

apply plugin: 'java'
apply plugin: 'eclipse'
apply plugin: 'org.springframework.boot'
apply plugin: 'io.spring.dependency-management'

group 'orh.example'
version '1.0-SNAPSHOT'
sourceCompatibility = 11

repositories {
    mavenCentral()
}

ext {
    set('lombokVersion', '1.18.8')
}

dependencies {

    compile('org.springframework.boot:spring-boot-starter-webflux')
    implementation 'org.springframework.boot:spring-boot-starter-thymeleaf'

    annotationProcessor "org.projectlombok:lombok:${lombokVersion}"

    implementation "org.projectlombok:lombok:${lombokVersion}"

    testCompile('io.projectreactor:reactor-test')
}
- WebFluxを使うためにを追加します。
- compile(‘org.springframework.boot:spring-boot-starter-webflux’)
- Thymeleafを使うために追加します。
- implementation ‘org.springframework.boot:spring-boot-starter-thymeleaf’
WebFluxApplication
package org.example;

import org.springframework.boot.SpringApplication;
import org.springframework.boot.autoconfigure.SpringBootApplication;

@SpringBootApplication
public class WebFluxApplication {
    public static void main(String[] args) {
        SpringApplication.run(WebFluxApplication.class, args);
    }
}
- 普通のプロジェクトと同じです。
SampleController
package org.example.web.sample.controller;

import org.springframework.stereotype.Controller;
import org.springframework.ui.Model;
import org.springframework.web.bind.annotation.GetMapping;
import org.thymeleaf.spring5.context.webflux.IReactiveDataDriverContextVariable;
import org.thymeleaf.spring5.context.webflux.ReactiveDataDriverContextVariable;
import reactor.core.publisher.Flux;

import java.time.Duration;

@Controller
public class SampleController {

    @GetMapping("/")
    public String index(Model model) {
        Flux<String> flux = Flux
                .range(0, 5)
                .map(i -> "count :" + i)
                .repeat(2)
                .delayElements(Duration.ofSeconds(1L));


        // data streaming, data driven mode.
        IReactiveDataDriverContextVariable reactiveDataDrivenMode =
                new ReactiveDataDriverContextVariable(flux, 1);

        model.addAttribute("items", reactiveDataDrivenMode);

        return "index";

    }

}
- Flux<T>:WebFluxでStreamを利用できるようです。
- 一つのオブジェクトを使うときはMono利用するようです。
Flux<String> flux = Flux
        .range(0, 5)
        .map(i -> "count :" + i)
        .repeat(2)
        .delayElements(Duration.ofSeconds(1L));
- 0から4まで「count:i」の文字列を生成してそれを2回繰り返します。
- 1回作成するたびにディィレェィをさせます。
IReactiveDataDriverContextVariable reactiveDataDrivenMode =
                new ReactiveDataDriverContextVariable(flux, 1);
- IReactiveDataDriverContextVariable:テンプレートのリアクティブフレンドリーな実行を駆動することを目的としたリアクティブデータストリームの形式で非同期オブジェクトをラップするコンテキスト変数によって実装されるインターフェイスです。(まだ勉強中。。。)
ReactiveDataDriverContextVariable
public ReactiveDataDriverContextVariable(final Object dataStream, final int dataStreamBufferSizeElements) {
    this(dataStream, dataStreamBufferSizeElements, null, DEFAULT_FIRST_EVENT_ID);
}
index.html
<html xmlns:th="http://www.w3.org/1999/xhtml">
<head>
</head>
<body>
<h1>FluxTest</h1>
<table>
    <thead>
    <tr>
        <th>title</th>
    </tr>
    </thead>

    <tbody>
    <tr th:each="item : ${items}">
        <td>[[${item}]]</td>
    </tr>
    </tbody>
</table>
</body>
</html>
アプリケーション起動結果
追記
20210121
モデル(Model)にはIReactiveDataDriverContextVariableのデータドリブンは2つ以上格納できない。
終わりに
まだ、知らないことが多くて詳しく書いてはいないですが、このサンプルコードを利用してあれこれやってみたいと思っています。
